
From yarn to luxury handwoven fabric: Weaving with merino wool to create a collection of designer scarves and snoods
- Emma Baker

- Sep 11, 2025
- 4 min read
As a handweaver my work involves taking cones of yarn which are then transformed into luxury designer scarves and snoods. Handweaving is a slow craft, it is an intentional process that involves considering the yarn, colour and weaving design with thought, skill and care. This blog shares the journey of weaving a luxury merino wool fabric which was later used to create a collection of scarves and snoods.

Choosing the yarn to create luxury designer scarves and snoods
Every weaving project begins with the yarn and for this project I decided to weave with 2/17nm merino lambswool. This yarn is one which I commonly weave with. I have a good range of colours of this yarn and am experienced in using this fragile yarn. The yarn is supplied coated in spinning oils which gives the yarn a little more strength and when these oils are removed when washed the fabric undergoes a transformation. When the fabric is finished it is beautifully soft, breathable and warm and is fine enough to create accessories which are lightweight.

Colour sampling can start with card winding
There are a number of processes I go through before committing the yarn to the loom. The first thing I often do is to do a card winding which enables me to see how the colours will work in the warp. Using a piece of stiff card, I wrapped strands of merino wool side by side in the planned sequence of chosen colours. This created a mini mock-up of the warp threads allowing me to see how the shades interacted with each other. I always like to include at least one colour which I term a 'colour pop'. For this weave I chose yarn in the shades of navy, indigo, emerald green, purple with a colour pop of bright yellow.

Small scale sample weaving before embarking on a larger floor loom project
One I was confident with my colour choice I used my TabbyandTweed small square frame loom to weave a sample square. Whilst this step is a little more time consuming than card winding it is a better way of seeing how the yarn colours interact in both the warp and the weft. I decided to weave a standard 2/2 twill weave.

Measuring the warp on a warping mill for the handwoven fabric
I decided to weave a warp length of 10m with a weaving width of 22inches at 15epi. This meant that I needed to measure out over 3km of yarn. I used my warping mill to do this as shown below. The warping mill has pegs at the top which enable a cross to be formed. This means that the warp can then be transferred onto the loom using lease sticks to maintain the cross and importantly the order of the warp threads.

Transferring the warp to the floor loom
The lease sticks were suspended at the back of the loom and the warp spread across the raddle at the top of the castle of the loom. The warp threads were therefore in order across the lease sticks.

Winding the warp onto the back beam
The warp threads were tied onto the back beam ready for the warp to be wound onto the back beam.

The image below shows the front of the loom. I now use a wide toothed hair comb to comb the warp threads in front of the loom. The warp threads are laid across a table in front of the loom with a heavy book sitting on top of the warp threads ensuring that the tension of the warp threads is maintained. This approach works brilliantly for me enabling me to wind the warp onto the back beam on my own without any help from others.

Threading the heddles
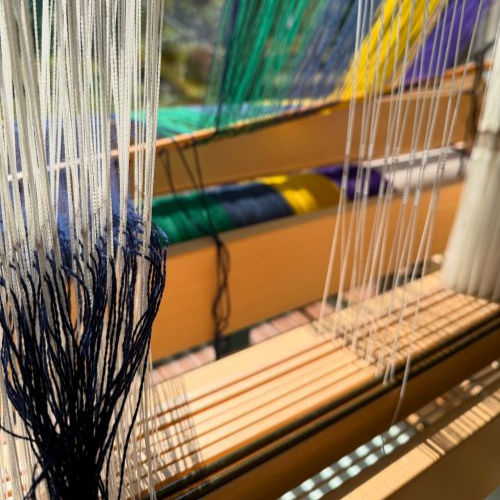
For this project the threading was straightforward. I had chosen to weave a twill design which can be woven on 4 shafts. Having an 8 shaft loom I decided to use all 8 shafts so the order of threading was 1-8. Each of the 330 warp threads was threaded through a hole in a single heddle, a process which is time consuming. Care is needed to make sure that the heddle on the correct shaft is threaded as a threading error at this point would create a mistake in the woven fabric.
The warp was tied to the front beam and the spools loaded with yarn

Weaving on a floor loom
For the first 8m of the warp a colour block twill design was woven with the weft replicating the yarn colours and dimensions of the warp.

A new pick up pattern was trialled
For the last 2m of the warp a new pattern was woven which included some areas of longer weft and warp floats to create a textured woven fabric.

Washing and finishing the fabric
Fresh off the loom the fabric is raw - firm, a little stiff and in need of finishing. It was washed gently by hand in warm water with handwash detergent to remove the spinning oils which coat the merino fibres. This washing is really important as it needs to be done gently so as not to felt the fabric. Once washed with detergent a fabric softener was used. This process of finishing not only removes the oils but allows the merino fibres to bloom and soften. Once dried and pressed the fabric was transformed becoming supple, drapey and luxuriously soft to the touch.
Creating the handwoven designer scarves and snoods
The final stage is the tailoring into wearable accessories. For the scarf a long rectangle was cut with a fray detail at each end. For the triangle scarf each of the three edges were oversewn neatly. The snoods were sewn with a French seam in a circle. Each of these accessories is totally unique.
A merino wool triangle scarf

A large handwoven merino wool designer shawl

A handwoven designer snood scarf

My handwoven scarves, snoods and accessories are available for purchase in my website shop for UK delivery.
Interested in learning to weave? Then my workshop page has all the details. Click here for details of scarf weaving workshops.
If you are interested in knowing what is on the loom, off the loom and workshop dates then do sign up to receive my weaving news emails by clicking here.


